phpMyAdmin
phpMyAdmin is a web interface that can be used to manage MySQL databases. It can be accessed through cPanel on a web server or on a local computer using software like XAMPP. Learn more about cPanel here and XAMPP here.
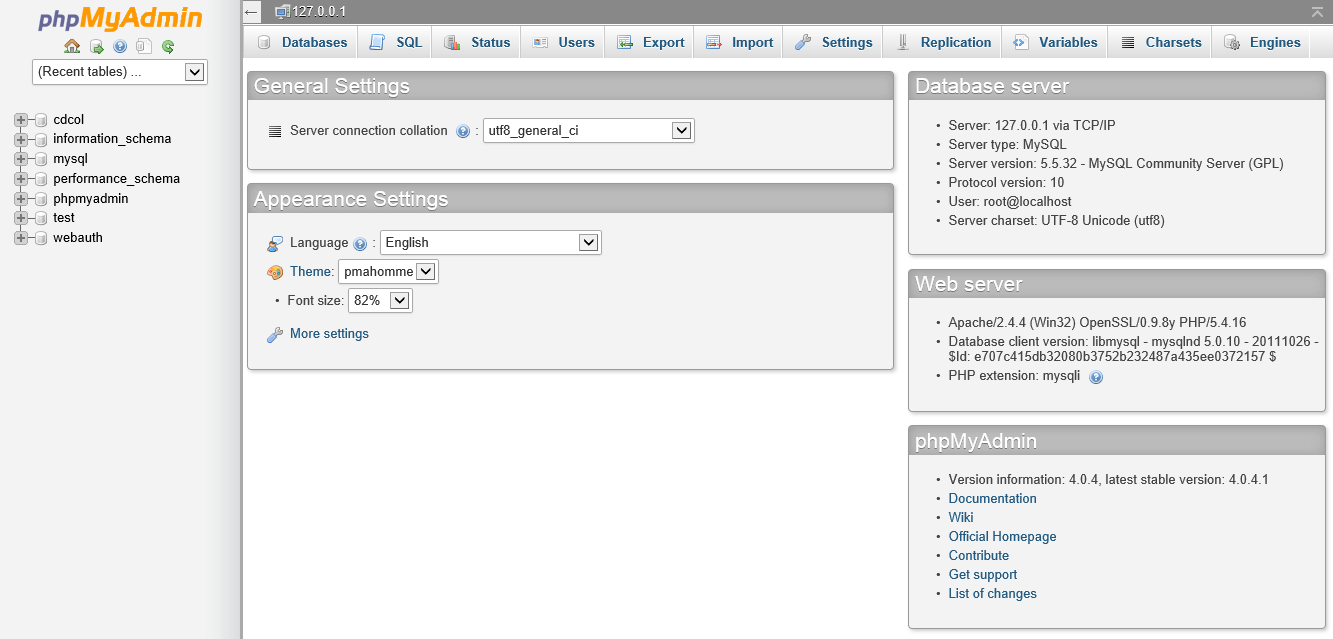
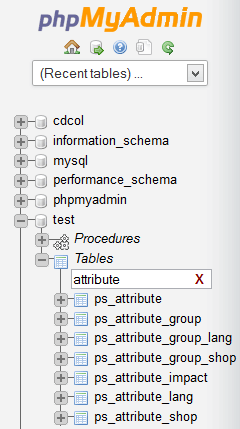
On the left side of phyMyAdmin is the navigation frame. At the top is the phpMyAdmin logo, buttons to return to the homepage, open the query window, view documentation and reload the frame, and a dropdown to jump to recently viewed tables. Below that is an expandable list of databases and tables.
In the right column displays the content of the current page. In the top-left corner is an arrow icon that can be used to collapse or expand the navigation frame. Alternatively, click and drag the divider in between the columns to resize the left and right columns. In the top-right corner is a button that can be used to automatically scroll back up to the top of the page.
There are also tabs to view databases, the query window, server status, users, export or import data and view settings, replication, variables, charsets and engines. On the homepage, there are general and appearance settings on the left and database and web server information on the right side. There is also links to the phpMyAdmin documentation, wiki, home, contribution, support and changelog pages.
Viewing a database
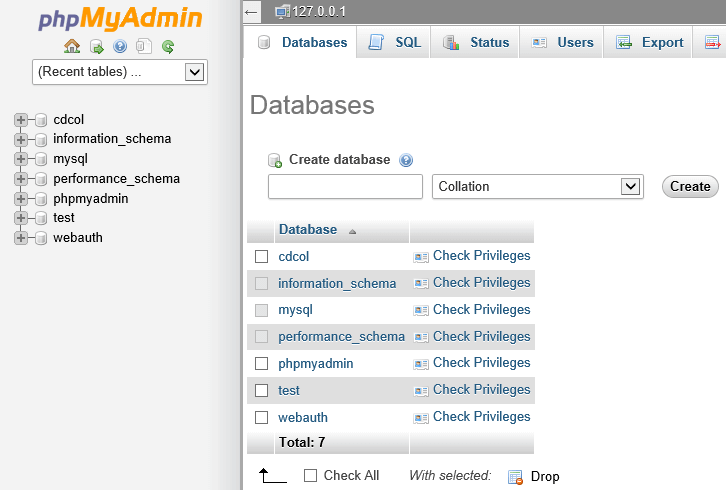
To view a database, click on its name in the left column. Alternatively, click the Databases tab in the right column and then click the database name.
Creating a new database
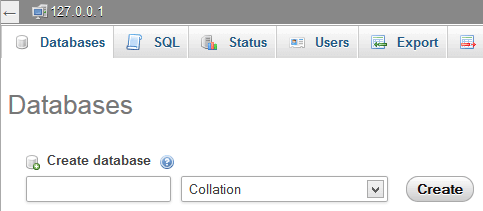
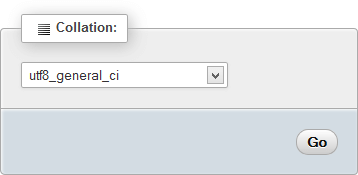
To create a new database, click the Databases tab in the right column, enter a name for the database in the text field, then choose a collation such as utf8_general_ci in the dropdown and then click the Create button to create the database.
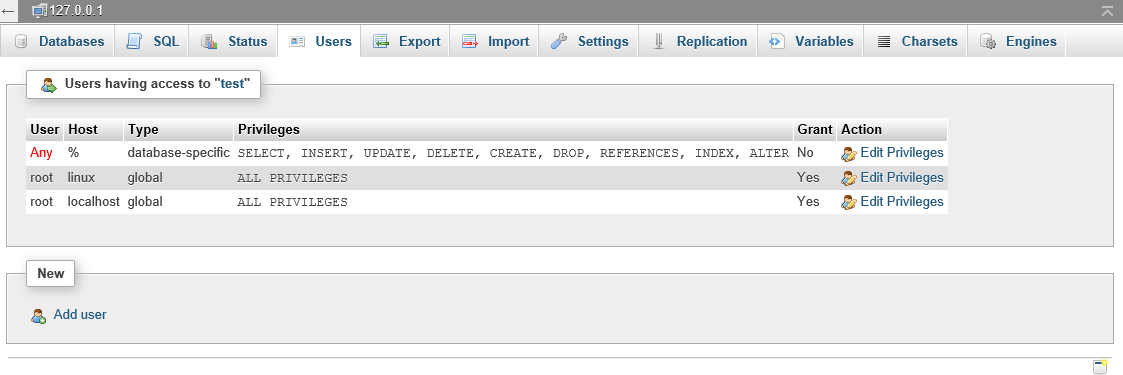
Managing database privileges
To manage user privileges of a database, click the Databases tab in the right column and then click the Check Privileges link on the right side of the database name. A list of users who have access to the database will then be displayed. Click the Edit Privileges link on the right side of a user row to choose their database privileges or remove them altogether.
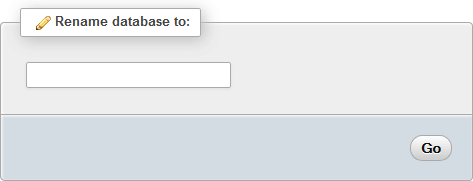
Renaming a database
To rename a database, click the database name in the navigation frame and then click the Operations tab. Enter the new name for the database in the Rename database to section on the left and then click the Go button.
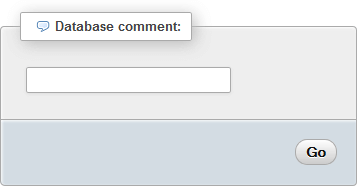
Adding a database comment
To add a database comment, click the database name in the navigation frame and then click the Operations tab. Enter the comment in the Database comment section on the left and then click the Go button.
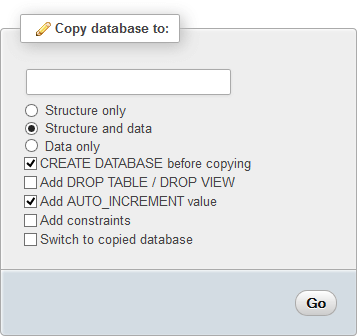
Duplicating a database
To duplicate a database, click on the database name in the navigation frame and then click the Operations tab. In the Copy database to section on the left, enter a name for the duplicate database. By default, the database structure and data will be copied.
Select Structure only to copy the database structure, but not any of the data. Select Data only to copy data from the database to another existing database. By default, CREATE DATA before copying is ticked. To copy data between databases when the user doesn't have permission to create databases, untick this.
If tables already exist in the duplicate database, tick the Add DROP TABLE / DROP VIEW checkbox to delete tables before copying, which causes tables to be overwritten them instead of have data merged. By default, the AUTO_INCREMENT value will be copied. Untick Add AUTO_INCREMENT value to reset the AUTO_INCREMENT value.
Tick the Add constraints checkbox if the database has constraints that should be copied. Tick Switch to copied database to switch to the duplicate database instead of staying on current database. When done, click the Go button to duplicate the database or copy data.
Changing the database collation
To change the collation of an existing database, click on the database name in the navigation frame then click the Operations tab. Use the dropdown in the Collation section on the right side and then click the Go button to save the change.
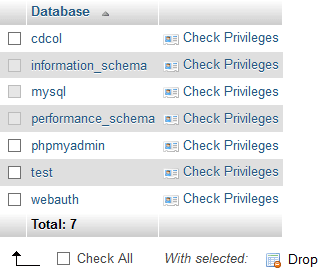
Deleting databases
To delete databases, click the Databases tab in the right column, tick the checkboxes of the databases to delete and then click the Drop button. A quicker way to delete all databases is to tick the Check All checkbox and then click the Drop button.
Alternatively, click the Database name, click the Operations tab and then click the Drop the database (DROP) link in the Remove Database section.
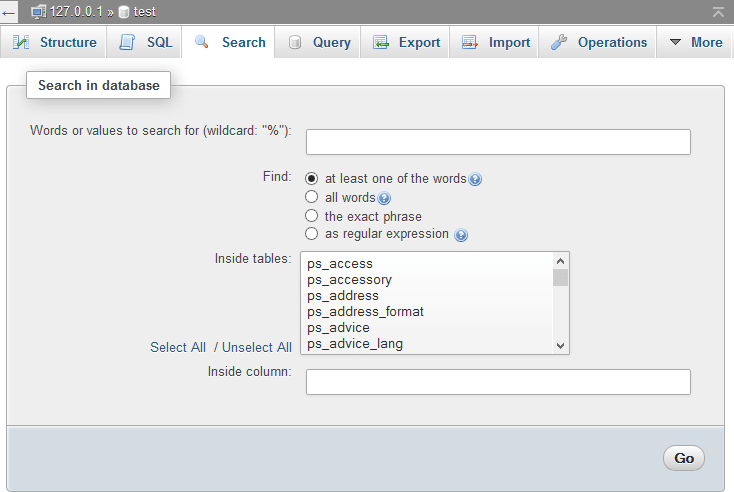
Searching a database
To search a database, click on the database name in the navigation frame and then click the Search tab at the top of the right column. Enter a word or phrase in the text field. Choose whether a search result must contain at least one of the words, all the words or the exact phrase.
To search for a suffix, enter a % in front of a word. To search for a prefix, enter a % at the end of a word. To search for any part of a word, enter a % at the start and end of the word. To perform a more complicated search, enter a regular expression in the text field and choose as a regular expression.
Choose which tables to search in the list box. Click the Select All link to select all database or the Unselect All link to deselect all databases. Enter a column name in the Inside column text field to search a that column only. When finished, click the Go button to perform the search.
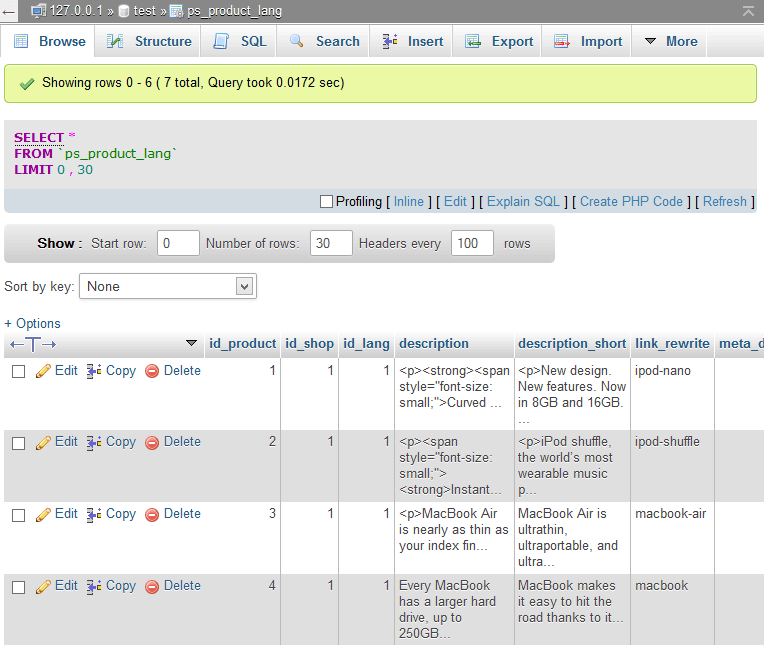
Browsing a table
There are a few different ways to browse a table. The Recent Tables dropdown at the top of the navigation frame can be used to browse a recently viewed table. If the table isn't in that list, click a database name in the navigation frame or on the Databases tab to view a list of tables in that database.
When browsing a table, click on a column header to sort the table alphabetically or numerically by that column. Click the column header a second time to sort descending. Drag a column header to change the order of columns.
Move the mouse over the line in between columns and then click and drag to resize the columns. Click the T icon on the left side of the column header to toggle between showing all the cell contents or truncating them. Click the down arrow on the right side of the first column header to choose which columns are visible.
By default, the first 30 rows of the table are displayed. Use the Show toolbar at the top to choose the start row, number of rows and after how many rows to repeat the column headers. Use the Sort by key dropdown to sort by a primary key.
Searching for a table
To search for a table, click the + button on the left side of the database to search, click the + button on the left side of Tables and then enter a keyword in the text field to filter the tables. Click on a table name to open that table or click the X icon on the right side of the text field to remove the filter.
Creating a new table
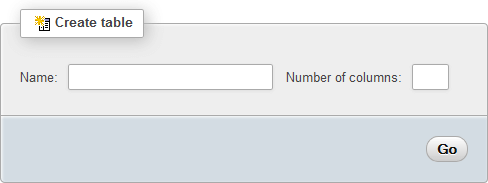
To create a new table, click on the + icon to the left of the database name in the navigation frame, click the + icon to the left of Tables and then click the New link. Alternatively, click on a table name, scroll down to the bottom of the right column, enter a table name and number of columns in the Create table section and then click the Go button.
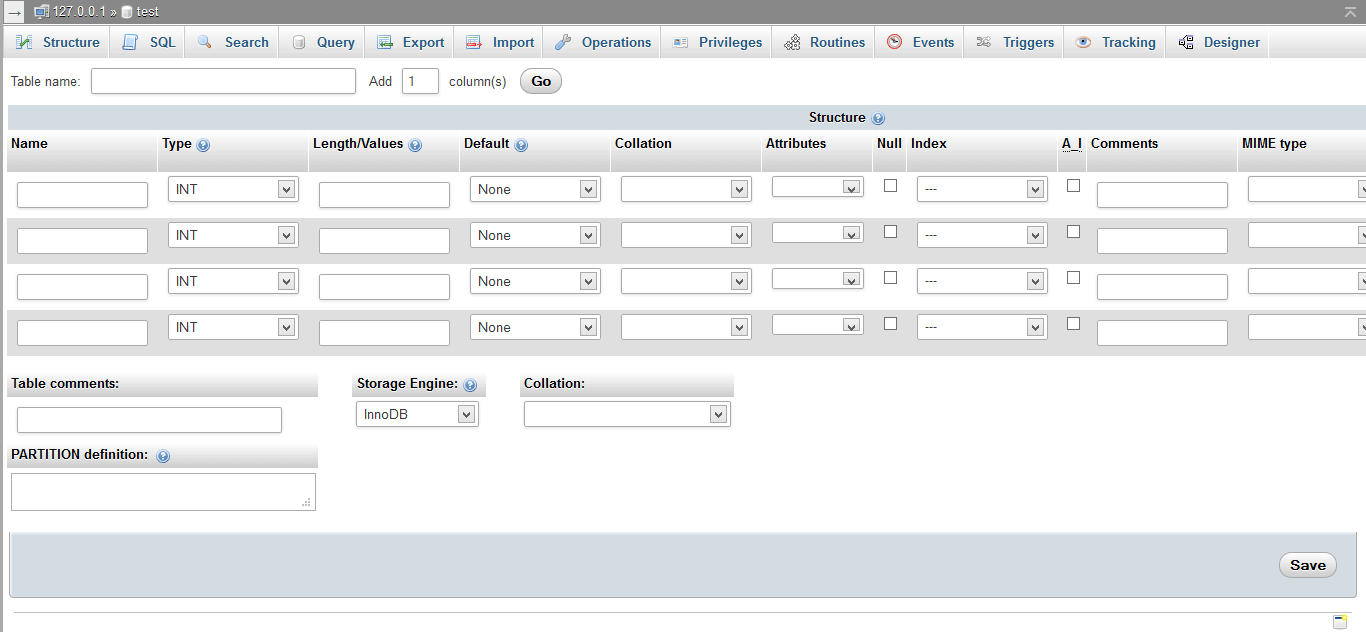
A form will then be displayed. Enter the table name if necessary and then enter the column names. If more columns are needed, enter the number of columns in the text field to the right of the table name and then click the Go button.
Choose a data type for each column such as INT for an integer, DECIMAL for a decimal number, VARCHAR for a string of fixed length, TEXT for a string of unlimited length or DATE for a date and time. Enter the length of the column in Length/Values text field. For example, enter 10 for an INT or 128 for a VARCHAR.
Use the Default dropdown to choose whether the column has a default value, which can be NULL, the current date or custom value. Set the Collation to an encoding such as utf8_general_ci. To sort strings case-sensitive instead of the standard case-insensitive, set the Attributes column to BINARY.
If the column is a number that should never be negative, set the Attributes column to UNSIGNED. If the column is an invoice number that should have zeros added to the front, set the Attributes column to UNSIGNED ZEROFILL.
If the column is a date that should be automatically updated with the current date and time whenever the row is changed, set the attribute to on update CURRENT_TIMESTAMP. If the column is allowed to be NULL, tick the NULL checkbox.
To make the column the primary key of the table, set the Index to PRIMARY. If the column is the primary key, but no two rows should have the same value in the column, set the Index to UNIQUE. If two rows can have the same value and the column should be searchable, set the Index to INDEX. If the column is a text column that will be searched using MATCH() / AGAINST() clauses, set the Index to FULLTEXT.
If the column should automatically increment with each new row, tick the A_I checkbox. There are other fields to add a comment about the column and set the MIME type and browser transformation. There are also fields at the bottom to set the table comments, storage engine, collation and partition definition.
Set the storage engine to InnoDB when possible, since it enables concurrency by using row-locking instead of table-locking. When finished, click the Save button to create the table.
Emptying a table
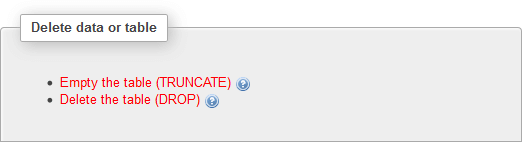
To empty a table, click on a database name and then click the Empty button in the Actions column to the right of the table's name to delete all the data in the table. Alternatively, click the table's name, click the Operations tab and then click the Empty the table (TRUNCATE) link in the Delete data or table section.
Deleting a table
To delete a table, click on a database name and then click the Drop button in the Actions column to the right of the table's name to delete the table and all its data. Alternatively, click the table's name, click the Operations tab and then click the Delete the table (DROP) link in the Delete data or table section.
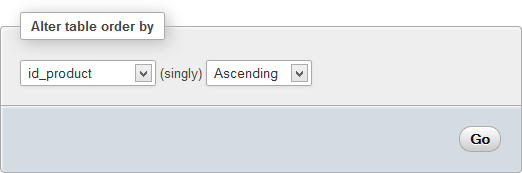
Changing a table's sort order
To change the table's sort order, click the database name in the navigation frame, click the table name and then click the Operations tab. If a table doesn't have a primary key or NOT NULL UNIQUE index, choose the column to use for sorting and either ascending or descending in the Alter table order by section on the left. Click the Go button to save changes.
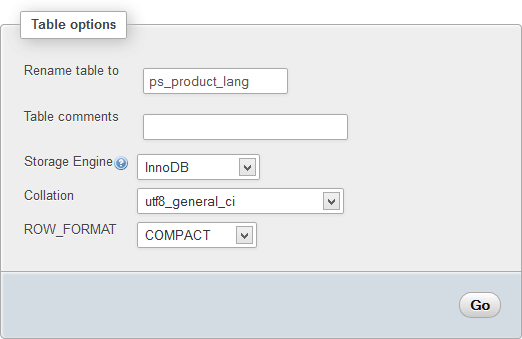
Changing table options
To change table options, click on the database name in the navigation frame, click on the table name and then click the Operations tab. Use the Rename table to field to rename the table, add a comment using the Table comments field and then choose the storage engine, collation and row format using the dropdowns. When done, click the Go button to save changes.
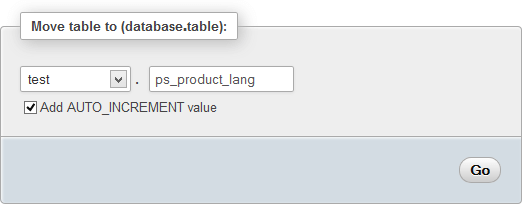
Moving a table to another database
To move a table to another database, click the database name in the navigation frame, click the table name and then click the Operations tab. Choose the database to move the table to and the name to give the table. By default, the AUTO_INCREMENT value is moved too. Untick the Add AUTO_INCREMENT value checkbox to reset the value. When done, click the Go button to move the table.
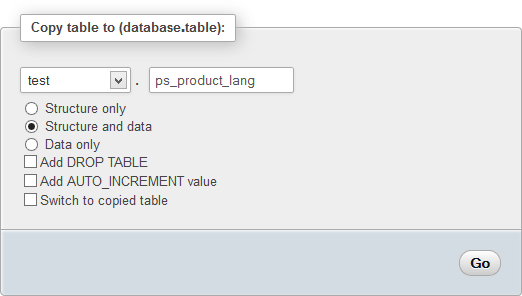
Duplicating a table
To duplicate a table or copy a table to another database, click the database name in the navigation pane, click the table name and then click the Operations tab. In the Copy table to section on the right, enter a name for the duplicate or choose another database and name for the table. By default, the table structure and data will be copied.
Select Structure only to copy the table structure, but not any of the data. Select Data only to copy data from the table to another existing table. To delete any existing table with the same name before copying, tick the Add DROP TABLE checkbox.
By default, the AUTO_INCREMENT value is not copied. Tick the Add AUTO_INCREMENT value checkbox to copy the value. Tick Switch to copied database to switch to the duplicate table instead of staying on current table. When done, click the Go button to duplicate the database or copy data.
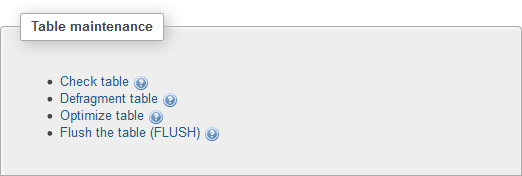
Performing table maintenance
To perform table maintenance, click on the database name in the navigation frame, click the table name and then click the Operations tab. There are four links in the Table maintenance section on the left. The Check table link checks for errors in the database, the Defragment table link sorts the order of indexes on the disk for faster access, the Optimize table link reorganises the physical storage of the table to reclaim space and the Flush the table link clears table caches.
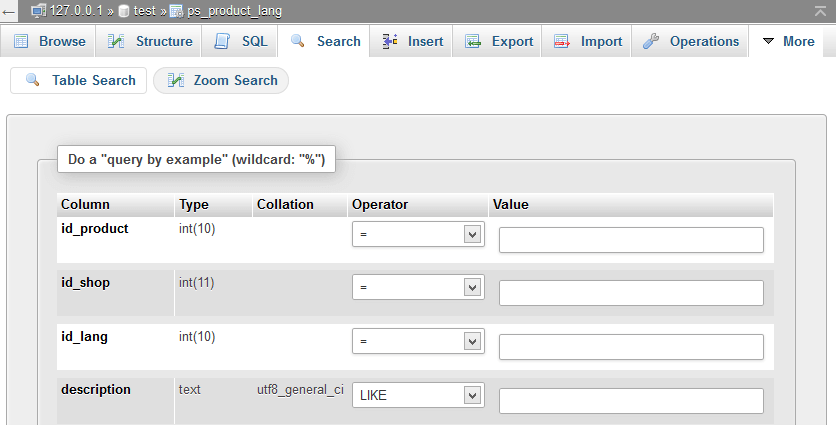
Searching a table
To search a table, click the database name and then click the Search link in the Actions column. Alternatively, click the table name and then click the Search tab at the top. The Search page will then be displayed with Table Search and Zoom Search subtabs.
The Table Search page allows simple queries on columns in the table to be performed. Enter a value to search for in the Value text field. Choose whether to search for rows that are equal to, greater than, greater than or equal to, less than, less than or equal to, or not equal to the value.
To search for a part of a string, use the LIKE operator and put a % in the value where the string can be different. Choose the LIKE %...% operator to automatically add a % to the start and end. The NOT LIKE operator can be used to search strings without the value.
To search for rows with one of a list of values, choose the IN (...) operator and then enter a comma-separated list of values. Use the NOT IN (...) operator to search for rows with a value not in the list. To search for rows within a range, choose the BETWEEN operator and enter a value such as 1 AND 100.
To search for rows not within a range, use the NOT BETWEEN operator instead. There are also IS NULL and IS NOT NULL operators that can be used to find rows that are or aren't NULL. There is also an Options link at the bottom that can be used to display more options.
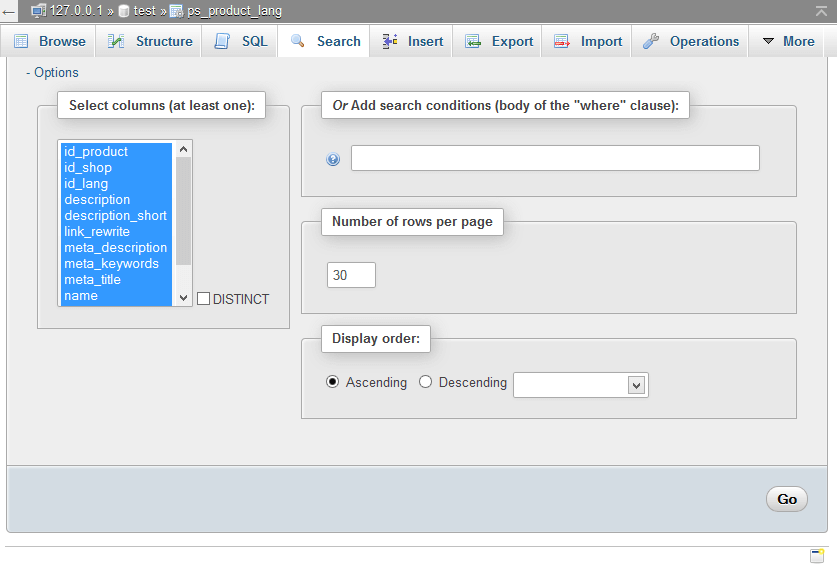
By default, all columns in the row are displayed in the search results. Use the Select columns list box to choose which columns are displayed. Enter any additional search conditions to add to the WHERE clause in the first text field and enter the number of rows per page in the second text field.
Choose whether to sort results ascending or descending by a particular column. When done, click the Go button at the bottom to perform the search.
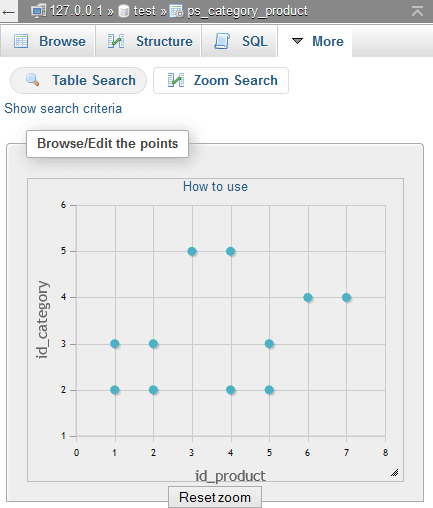
Graphing two columns of a table
To graph two columns of a table, click the database name and then click the Search link in the Actions column. Alternatively, click the table name and then click the Search tab at the top. The Search page will then be displayed with Table Search and Zoom Search subtabs.
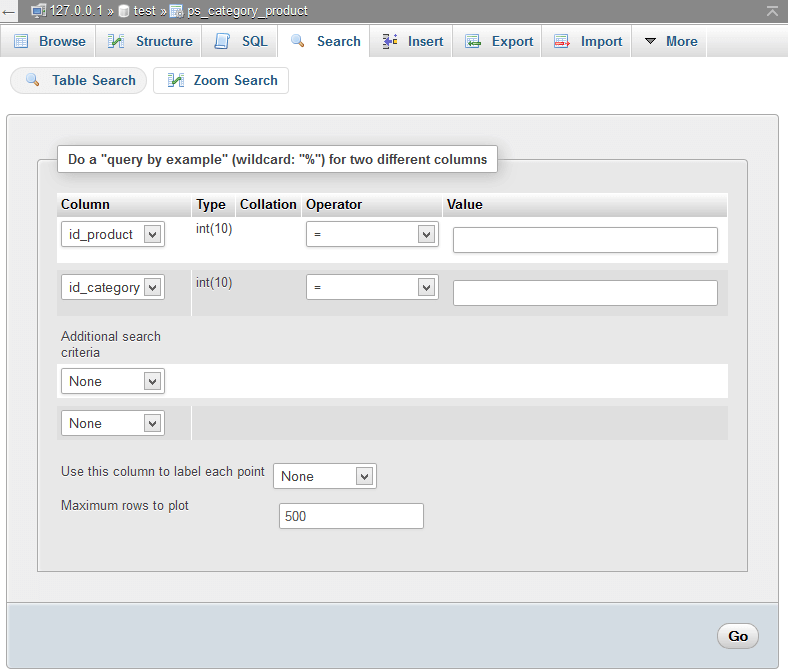
Click the Zoom Search subtab. Choose the column to display as the x-axis along the bottom and the column to display as the y-axis along the left side. To graph only rows with a specific value in the column, choose an operator and value.
Use the two dropdowns in the Additional Search Criteria section to filter the data by up to two more columns. There are also options to choose a column to display as the label on each point and set the maximum number of rows to plot. When finished, click the Go button.
A graph of the selected columns with blue dots will then be displayed. Click and drag on the graph to draw a box to zoom in. Click the Reset Zoom button at the bottom to view the entire graph. Use the diagonal line icon in the bottom-right corner to resize the graph. Click the Show Search Criteria link at the top to change the graph settings.
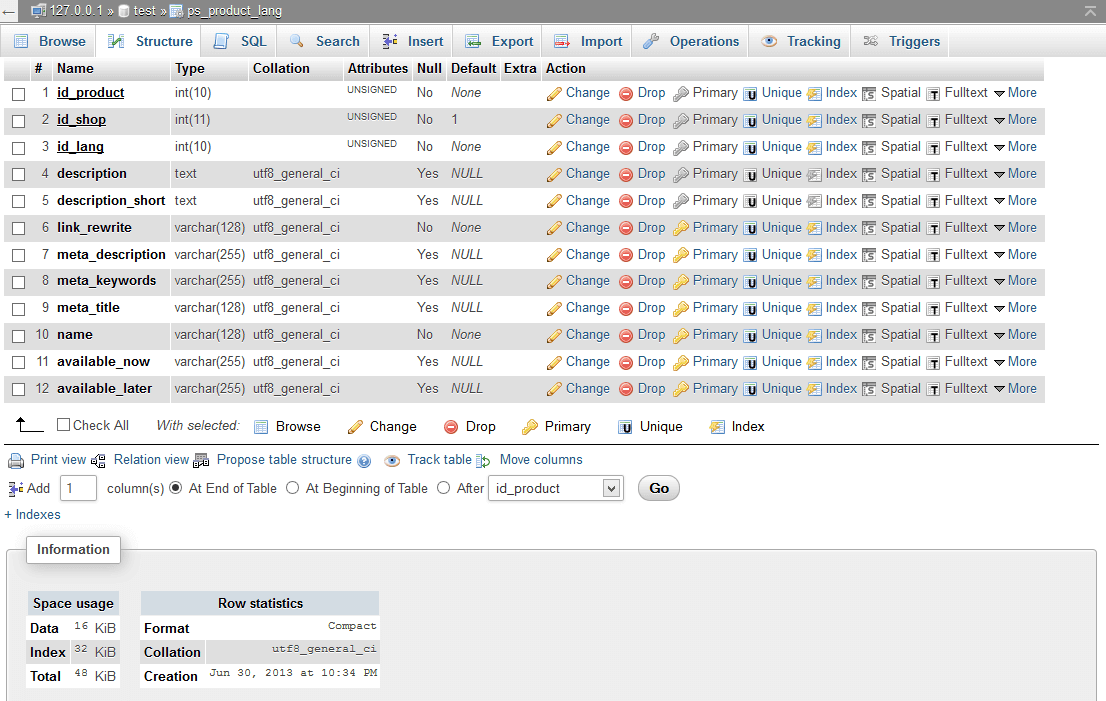
Editing a table's structure
To edit the structure of a table, click on the database name in the navigation frame and then click the Structure link in the Action column of the table. Alternatively, click on the table name and then click the Structure tab. A list of the table columns will then be displayed. At the bottom is information including the space usage and row statistics.
Editing a column
To edit a column, click the Change link in the Action column. To edit multiple columns at a time, tick the checkboxes on the left side of each column name or tick the Check All checkbox to select all of them and then click the Change link at the bottom. When finished editing, click the Save button in the bottom-right corner.
Deleting a column
To delete a column, click the Drop link in the Action column. To delete multiple columns at a time, tick the checkboxes on the left side of each column name and then click the Drop link at the bottom.
Adding a column
To add columns to a table, enter the number of columns to add in the text field to the right of Add, choose whether the new columns will appear at the end of the table, at the beginning of a table or after a specific column and then click the Go button. Enter the name, type of other information for the new column and then click the Save button in the bottom-right corner.
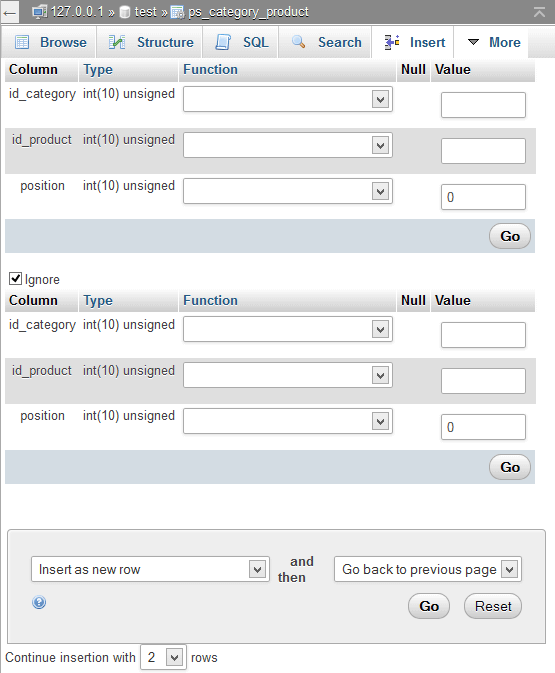
Inserting a row into a table
To insert a row into a table, click the database name and then click the Insert link in the Action column of a table. Enter a value for each column or tick the Null checkbox if the column has no value. If a row isn't needed, tick the Ignore box in the top-left corner to ignore the row.
Click the Go button on the right side below the last column value to save that row. To save all rows, click the Go button at the bottom of the page. By default, an error message will display in cases such as a duplicate key. To ignore errors, choose Insert as new row and ignore errors in the first dropdown.
To see the SQL query without performing the insertion, choose Show insert query in the first dropdown. To insert more rows after insertion, choose Insert another new row in the second dropdown and then enter how many new rows in the dropdown at the bottom of the page.
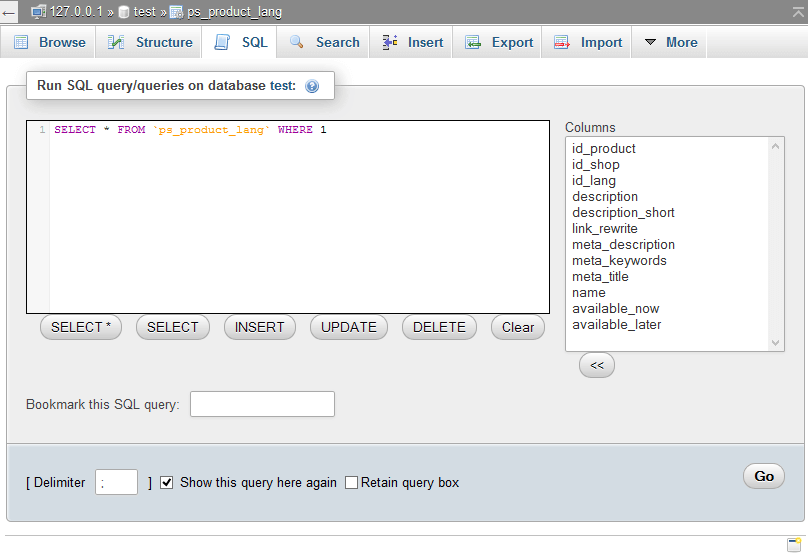
Performing an SQL query
To perform an SQL query, click on a database name, click on a table name and then click the SQL tab. The SQL query builder will then be displayed with table columns on the right side. By default, a query that displays all rows and columns will be displayed.
To choose which columns are displayed, highlight the * in the query, select the columns to display and then click the << button. To choose which rows are displayed, highlight the 1 at the end of the query, select a column to filter by and then click the << button.
If the selected column is a number, enter a comparison operator such as =, <, <=, > or >= and then a number to display rows equal to, less than, less than or equal to, greater than, or greater than or equal to the value. Use either the operator != or <> to display rows not equal to the value. For example, `id_product` = 1 will display all rows that have the id_product column equal to 1.
If the selected column is a string, enter the LIKE operator followed by a string. A % sign can be placed anywhere that letters can be different. For example, `name` LIKE 'A%' will display all rows starting with the letter A.
To filter by multiple columns, use a Boolean operator such as AND or OR. For example, `id_product` > 1 AND `id_product` < 100 will display rows where the id_product is between 1 and 100 and `name` LIKE 'A%' OR `name` LIKE 'B%' will display rows where the name starts with either A or B.
Below the query text area are buttons to switch between the default SELECT all columns, SELECT individual columns, INSERT row, UPDATE row, DELETE row queries. The Clear button can be used to delete the current query.
Below the buttons is a text field that can be used to name the query so it can be quickly accessed when needed. Below that is a text field that can be used to change the delimiter that separate multiple queries, which can be used to execute multiple INSERT, UPDATE and DELETE queries in one go.
By default, the SQL query form will be hidden after the query is performed and the SQL query will remain in the text area. Untick Show this query here again to reset the SQL query after it is performed and tick Retain query box to prevent the form from hiding. When done, click the Go button to execute the query.
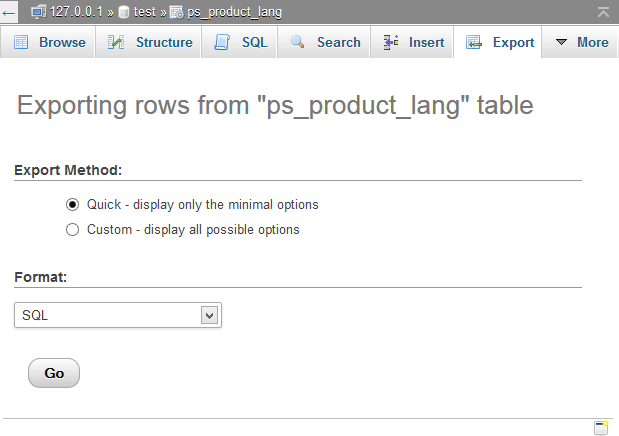
Exporting a table
To export a table, click on the database name in the navigation frame, click the table name and then click the Export tab. The Export page will then be displayed. By default, only the Format option is displayed. If backing up the table, leave it on SQL.
There are many other options to make it easier to import the table data into applications. Options include CodeGen, CSV, CSV for MS Excel, Microsoft Word 2000, JSON, LaTeX, MediaWiki Table, OpenDocument Spreadsheet, OpenDocument Text, PDF, PHP array, Texy! text, XML and YAML.
When done, click the Go button to download the file. By default, the file is uncompressed. To compress the file and access many other options, change the Export Method from Quick to Custom.
By default, all rows of the table are exported. If there are many rows, it may be required to download the table in pieces. To do this, choose Dump some row(s), enter the number of rows to export and the row number to start at. After exporting the rows, add the number of rows to the row number to begin at to download the next set of rows.
The file that is downloaded has the table name as the filename by default, is UTF-8 encoded and has no compression. Change the filename using the File name template text field. By default, the filename will be saved for future exports. Untick the use this for future exports checkbox to keep the previous default.
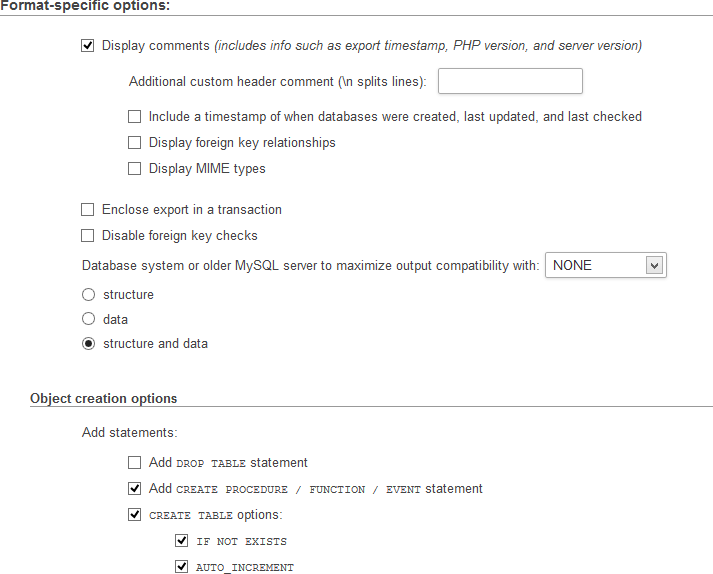
Use the Character set of the file dropdown to change the encoding of the file and use the Compression dropdown to change the compression method to zipped, gzipped or bzipped. At the bottom of the page are format-specific options that can be used to change what statements are included in the file and their format.

By default, comments with information such as export timestamp, PHP version and server version are included in the file. There are also options to include a timestamp of when databases were created, last updated and last checked, display foreign key relationships, display MIME types and add a custom header comment. Untick the Display comments checkbox to remove these comments from the file.
There are also options to enclose the export in a transaction to prevent changes being made to rows while they are being exported, disable foreign key checks and choose a database system to maximise output compatibility with. By default, table structure and data is exported. Use the Structure and Data radio buttons to export only table structure or data.
To delete and recreate the table before importing data, tick the Add DROP TABLE statement checkbox. By default, statements to create table procedures, functions and events may be added to the file. Untick the Add CREATE PROCEDURE / FUNCTION / EVENT statement checkbox to remove these statements.
Also by default, CREATE TABLE statements are added to the file to ensure a table exists before data is inserted. The IF NOT EXISTS checkbox prevents an error occurring if the table already exists. The AUTO_INCREMENT checkbox automatically increments IDs when a value isn't specified.
By default, table and column names are surrounded by the backquote ` to protect special characters and keywords. To reduce the size of the file when backquotes aren't needed, untick the Enclose table and column names with backquotes checkbox.
The Truncate table before insert checkbox can be ticked to empty the table before the data is inserted. There are also options to use INSERT DELAYED statements to delay inserting until the database is not in use and use INSERT IGNORE statements to ignore errors so rows continue to insert.
Use the Function to use when dumping data dropdown to choose whether to write data using INSERT, UPDATE or REPLACE statements. Use the Syntax to use when inserting data section to choose whether to include column names and combine multiple rows into a single statement.
The Maximal length of created query text field can be used to adjust the length of queries so they don't exceed the maximum packet size when they are executed. If a query exceeds the maximum length, it will be split into multiple smaller statements.
By default, binary columns are written in hexadecimal notation and timestamps are written in UTC so it can be imported onto a server in a different timezone. Use the Dump binary columns in hexadecimal notation and Dump TIMESTAMP columns in UTC checkboxes to disable these options.
When done, click the Go button to export the data and download the file. Once the file has downloaded, keep it for backup purposes or import it into an application.
Exporting a database
To export multiple tables or an entire database, click on the database name in the navigation frame, click the Export tab and then click the Custom radio button. By default, all tables in the database will be exported.
Use the list box to choose which tables are exported. Click the Select All or Deselect All links to select all or none of the tables. To select a range of tables, click on the first table, hold down the Shift key and then click the last table.
To select individual tables, hold down the Ctrl key and then click the table. When done, click the Go button to export the tables and download the file. Once the file has downloaded, keep it for backup purposes or import it into an application.

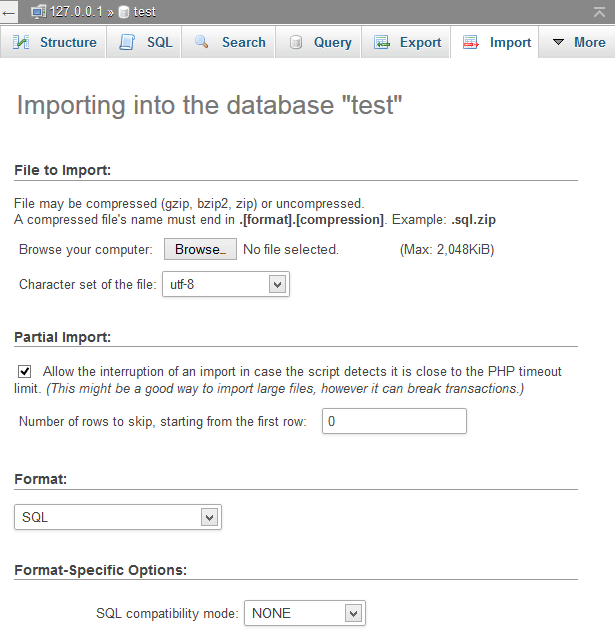
Importing tables
The Import option can be used to restore a backup, move data between servers or quickly insert data. To import tables, click the database name in the navigation frame and then click the Import tab. Click the Browse… button to select the file to import. If the file isn't encoded in utf-8 format, change the encoding using the Character set of the file dropdown.
By default, the import will be interrupted if the file is too big to be imported without exceeded the PHP timeout limit. If the file contains transactions, it is better to untick this option and upload smaller files to prevent transactions being broken. When a file is interrupted and imported for a second time, enter the number of rows to skip to prevent data being imported twice.
Use the Format dropdown to choose the same format the file was exported into. If the file was exported for a specific database system, select it in the SQL compatibility mode dropdown. By default, if the file uses 0 in a column with autoincrement, it will be preserved instead of set to the next available ID.
Untick the Do not use AUTO_INCREMENT for zero values checkbox to disable this behaviour so that both 0 and NULL are changed to the next available ID. When done, click the Go button to import the file.
Tracking table queries
To track queries performed on a table, click on the database name, click the table name and then click the Tracking tab. Choose the type of queries to track and then click the Create Version button.
![]()
A list of tracking reports will then be displayed. Click the Deactivate Now button to stop tracking. Click the Tracking Report link to view the tracking report or the Structure Snapshot link to view a snapshot of the table structure.
![]()
On the tracking report, a list of queries are displayed. Click the Delete button on the right side to delete a query from the report. Below the list are options to filter the queries by structure or data, date and user and options to export and download the report.
![]()
To see a list of all tracked and untracked tables, click the database name and then click the Tracking tab. Click the Drop link in the Action column to stop tracking a table. Click on the Track Table link to start tracking a table.
![]()
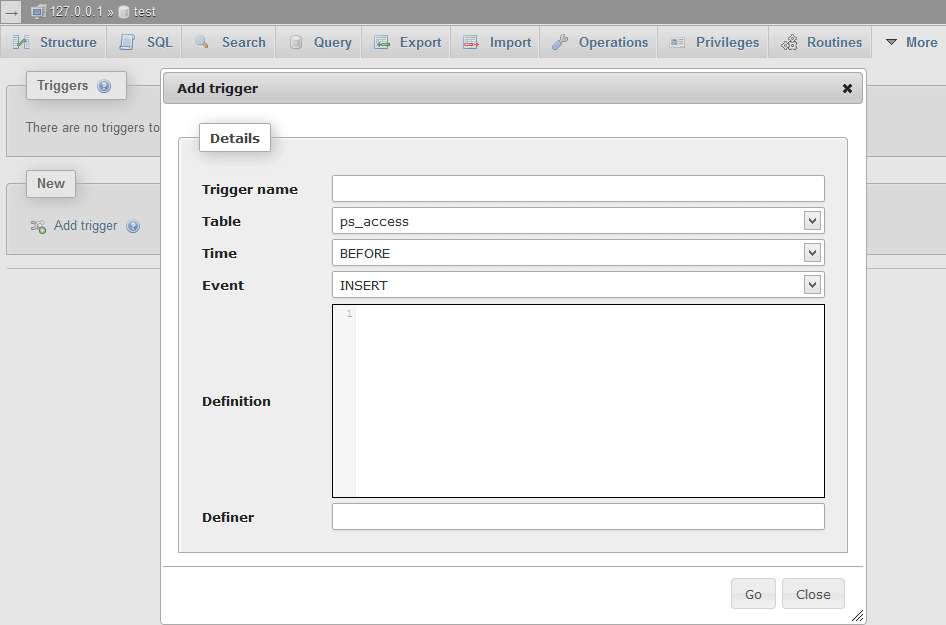
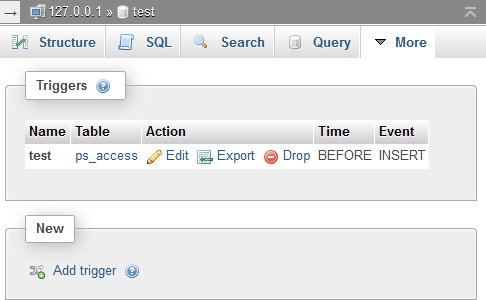
Adding a trigger
A trigger can be used to perform queries to keep data consistent between tables and update statistics. To add a trigger, click on a database name in the navigation frame and then click the Triggers tab. A list of triggers will then be displayed. Click the Add Trigger link to display the Add Trigger dialog.
Enter a name for the trigger, choose the table that will set off the trigger, choose whether the trigger is executed before or after the query and choose whether INSERT, UPDATE or DELETE queries set off the trigger. Enter the query to execute when the trigger is set off in the Definition text field.
By default, the trigger will only execute for the current user. To add the trigger for another user, enter their username in ' format in the Definer text field. When done, click the Go button to save the trigger.user_name'@'host_name'
After creating a trigger, a list of triggers will be displayed. Click the Edit link to edit the trigger. Click the Export link to view the trigger code. Click the Drop link to delete the trigger.
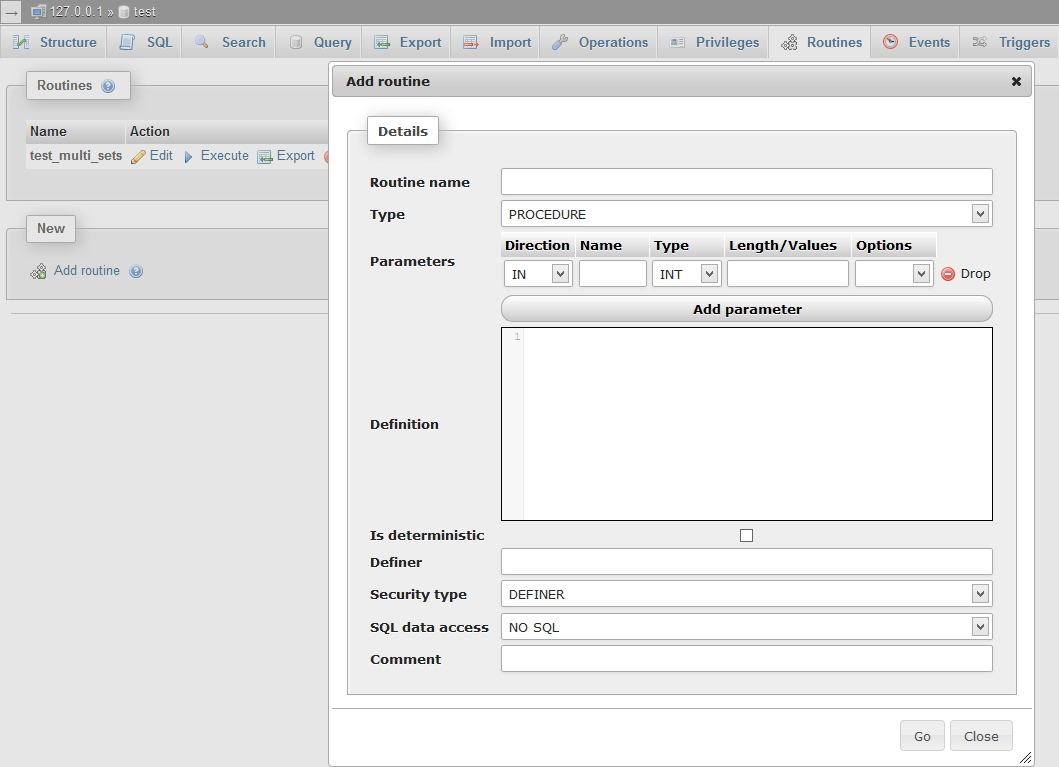
Adding a routine
A routine can be used to execute a sequence of queries using parameters. This makes it easier to retype queries and can make them easier to understand. To create a routine, click on a database name and then click the Routines tab. A list of routines will then be displayed. Click the Add Routine link to open the Add Routine dialog.
Enter a name for the routine and choose whether it is a procedure or function. A procedure is used to perform queries on the database and doesn't return any value except for the parameters. A function is used to return a value and can be used in a query.
Use the Parameter row to add a new parameter. Choose whether the parameter is only passed IN, only returned OUT or both IN OUT. Enter a name for the parameter. Choose the type of the parameter such as an integer or string. Enter the length of the parameter or its values. Optionally use the Options dropdown to make the parameter UNSIGNED, ZEROFILL or both. Click the Add Parameter button to save the parameter.
Click the Drop link to delete a parameter that was added. Enter the routine code in the Definition text area and if the code always returns the same value for the same parameters, tick the Is Deterministic checkbox.
By default, only the current user will be able to execute the routine. To give permission to another user instead, enter their username in ' format in the Definer text field. To give the routine the same permissions as what called the routine, change the Security Type to INVOKER.user_name'@'host_name'
If the routine contains SQL, reads SQL data or modifies SQL data, select the appropriate security level using the SQL Data Access dropdown. There is also a text field that can be used to enter a comment that describes the routine and how to use it. When done, click the Go button to save the routine.
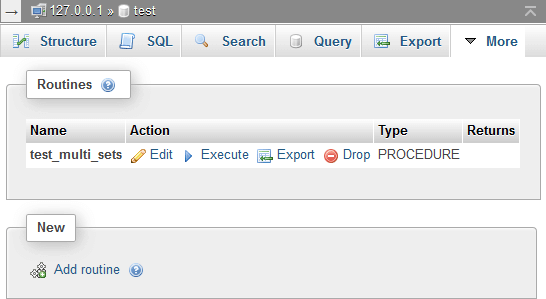
After creating a routine, a list of routines will be displayed. Click the Edit link to edit the routine. Click the Execute link to run the routine. Click the Export link to view the routine code. Click the Drop link to delete the routine.
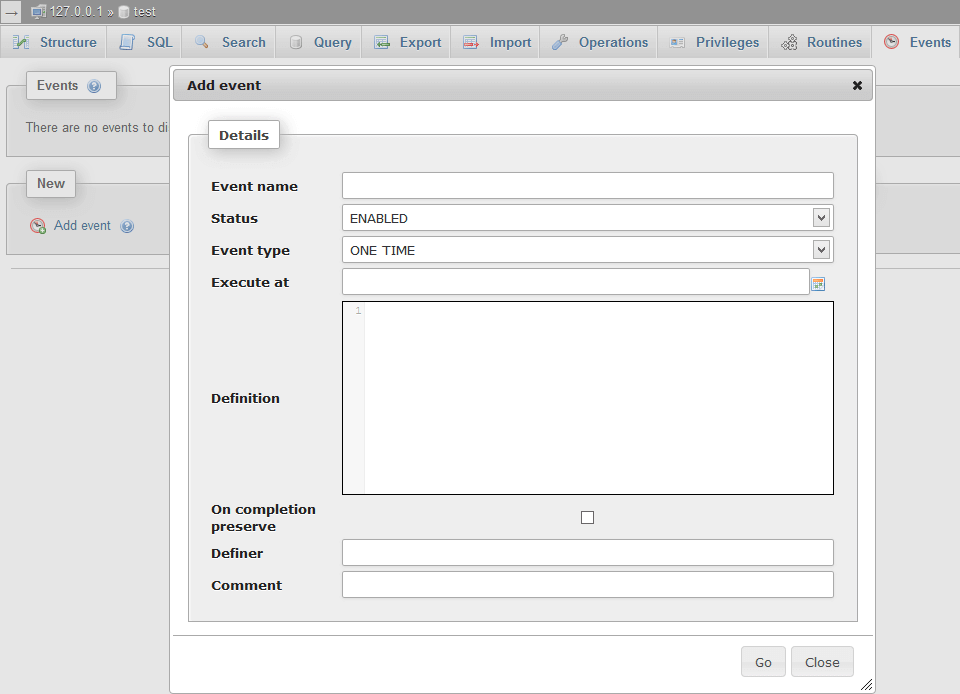
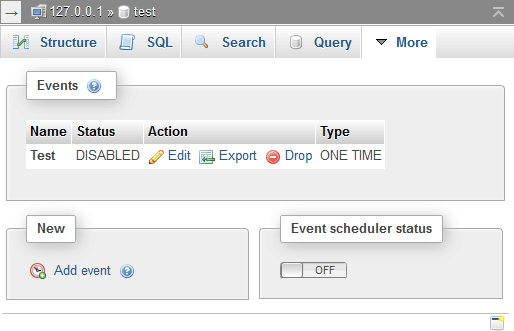
Adding an event
An event can be used to perform a query at a specified time. To add an event, click on a database name and then click the Events tab. A list of events will then be displayed. Click the Add Event link to open the Add Event dialog. Enter a name for the event and then choose whether it is enabled or disabled.
Choose SLAVESIDE_DISABLED to mark the event as replicated from another server and disabled. Choose whether the event is executed one time or is recurring. If it is a one-time event, click the calendar icon on the right side of the Execute At text field to choose a date and time to execute the query.
If it is a recurring event, enter how often the event should occur and choose the time format as number of years, quarters, months, days, hours, minutes, weeks, seconds, years and months, days and hours, days and minutes, days and seconds, hours and minutes, hours and seconds or minutes and seconds.
The Start and End text fields can be used to limit the recurring event to a specified time period. By default, the event will automatically be deleted once it expires. To preserve the event after it expires, tick the On Completion Preserve checkbox.
Enter the query to execute in the Definition text area. By default, the event will only execute for the current user. To give permission to another user instead, enter their username in ' format in the Definer text field.user_name'@'host_name'
Optionally enter a comment to describe the event and then click the Go button to add the event.
After creating an event, a list of events will be displayed. Click the Edit link to edit the event. Click the Export link to view the event code. Click the Drop link to delete the event. Click the button in the Event Scheduler Status section to turn the event scheduler on or off.
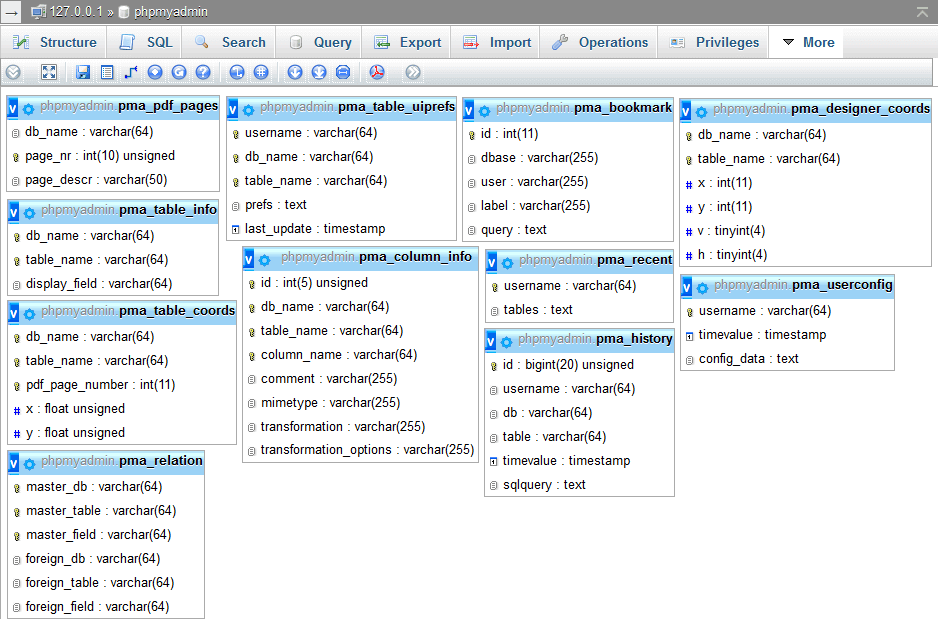
Creating an entity-relationship diagram
An entity-relationship diagram can be used to see all the columns of all tables in a database and how they relate to one another. To create an entity-relationship diagram, click on a database name and then click the Designer tab. Each table will display as a box containing table columns.
A column will have a key icon if it is a primary key, a hash icon if it is a number, a calendar icon if it is a timestamp, or a document icon if it is text. If there are many tables, the boxes will overlap. To choose which tables are displayed, click the first button on the toolbar and then tick or untick the table checkboxes.
Click the down arrow icon on the left side of the header to toggle between hiding and showing the table columns. Use the Toggle small/big button to toggle between hiding and showing the table columns in all boxes. Use the Choose column to display button to hide specific columns from a box.
Click the Full Screen button on the toolbar to display the browser full screen to create more room for the diagram. Click and drag the blue header of a box to move it around. Click the Snap to grid button to make it easier to line up boxes.
To add a relation, click the Create relation button and click on two primary keys from different boxes to connect them with a line. Use the Toggle relation lines button to hide or show relation lines. When done, click the Save icon in the toolbar to save the diagram.
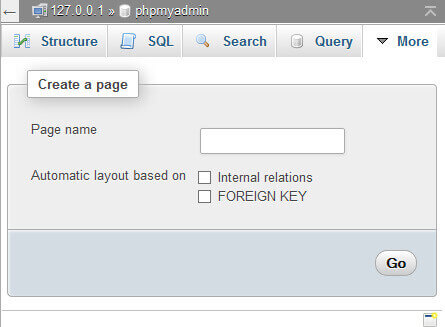
Exporting an entity-relationship diagram
Before exporting an entity-relationship diagram, a page must be created. Click on a database name, click the Operations tab and then click the Edit or export relational schema link at the bottom. The Create a page page will then be displayed. Enter a name for the page and enable the automatic layout options to put all linked tables onto the page. Click the Go button to save the page.
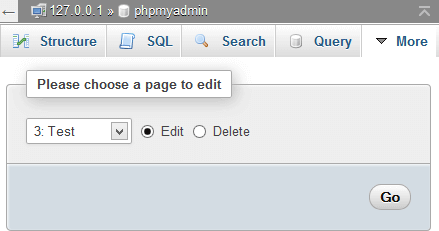
After creating a page, the Please choose a page to edit section will be displayed. To edit a page name and settings, select it in the dropdown, select the Edit option and then click the Go button. To delete a page, select it, select the Delete option and then click the Go button.
The Select Tables section can be used to add tables to the diagram. Choose a table in the dropdown, enter the X and Y coordinates of the table in the diagram, choose whether to display table column names and then click the Save button. To delete a table, tick the Delete checkbox and then click the Save button.
Click the Toggle Scratchboard button to see a preview of the diagram. Click and drag a box to move it around. When done, use the Display relational schema section to choose whether to export the schema as a PDF, SVG, DIA or EPS file. There are also options to show a grid, show colour, show dimensions of the table, display all tables with the same width, show a data dictionary, and only show keys.
Choose whether to show the diagram landscape or portrait on A3, A4, A5, letter or legal paper and then click the Go button to generate the diagram and download the file.

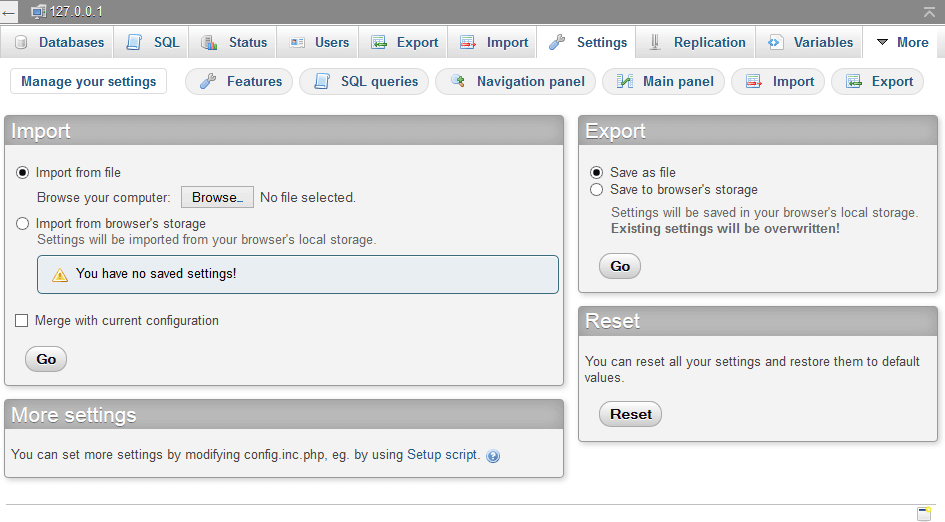
Managing settings
There are many settings in phpMyAdmin. To manage settings, click the Home icon in the navigation frame and then click the Settings tab. There are six categories of settings including Features, SQL Queries, Navigation Panel, Main Panel, Import and Export.
Each section has its own subsection of settings along with descriptions and buttons at the bottom to save changes or reset the settings. On the Manage Your Settings tab are options to import, export and reset settings. There is also an option to open phpMyAdmin Setup in a new window to change more settings.
To export settings, choose whether to save settings to a file or to the browser's local storage and then click the Go button. To import settings, choose whether to import settings from a file or from the browser's local storage. If importing from a file, click the Browse… button to upload the settings file.
Tick the Merge with current configuration checkbox to merge the settings instead of replacing them. Click the Go button to import the settings. To reset all settings to their default values, click the Reset button.
As well as the Settings tab, there are Variables, Charsets and Engines tabs that can be used to view variable, charset and storage engine settings.
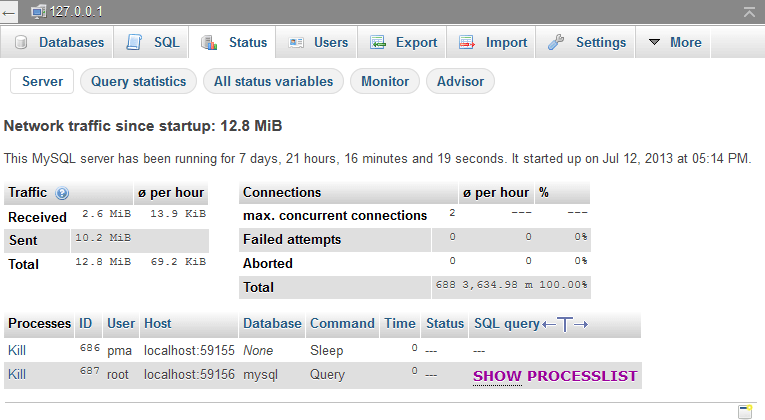
Viewing server status, statistics and performance issues
To view server status, statistics and performance issues, click the Home icon in the navigation frame and then click the Status tab. Information about the server traffic and how long it has been running will be displayed.
There are also tabs to view query statistics and status variables, monitor questions, connections, processes, traffic, CPU usage, system memory and system swap, and view a list of potential performance issues.
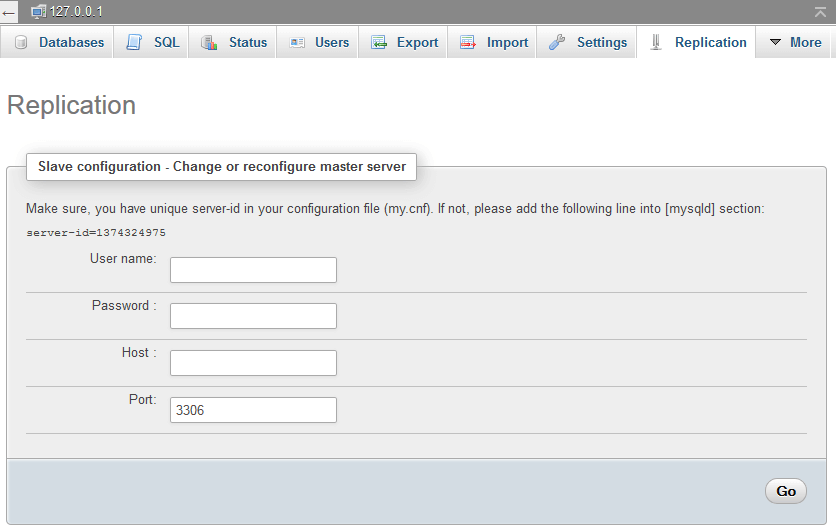
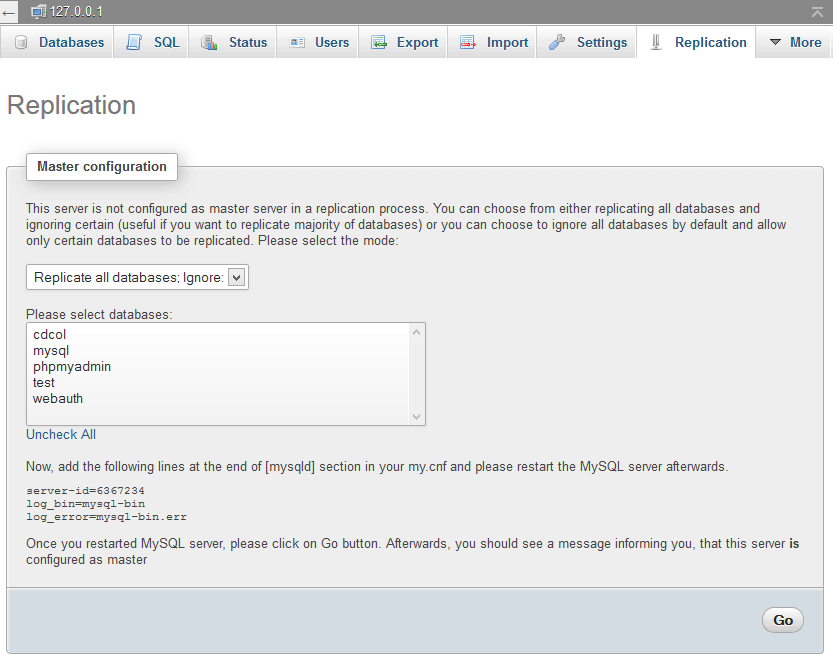
Replicating databases to another server
To replicate databases to another server, click the Home icon in the navigation frame and then click the Replication tab. To configure the master server, click the Configure link in the Master Replication section. The Master Configuration page will then be displayed.
Choose the Replicate all databases; Ignore option to replicate all database except the selected ones or choose the Ignore all databases; Replicate option to replicate only the selected ones. Click the Go button to enable replication.
To configure the slave server, click the Configure link in the Slave Replication section. The Slave Configuration page will then be displayed. Enter the master server address in the Host field and a username and password to connect to the server. Click the Go button to save the configuration.